QuickOrder Documentation
Developed by Omar Jabar
Welcome to the comprehensive documentation for QuickOrder. This guide will help you install, configure, and customize the plugin to create beautiful order forms for your WooCommerce products.
Getting Started
QuickOrder is a powerful WordPress plugin that allows you to create custom order forms for your WooCommerce products. With this plugin, you can:
- Replace the standard WooCommerce Add to Cart button with a custom form
- Customize the appearance and position of your order forms
- Create proper WooCommerce orders with all form data stored in the admin area
- Add a quantity field with dynamic price calculation
- Display a mobile-friendly sticky button for better user experience
- Export order data to Google Sheets for easy tracking
- Protect your forms with Google reCAPTCHA integration
- Create multilingual forms with field-level translations
This documentation will guide you through all aspects of using the plugin, from installation to advanced customization.
Installation
Follow these steps to install and activate the QuickOrder plugin:
Prerequisites
Before installing, make sure you have:
- WordPress 5.0 or higher
- WooCommerce 4.0 or higher
- PHP 7.2 or higher
Method 1: Install via WordPress Admin
- Log in to your WordPress admin dashboard
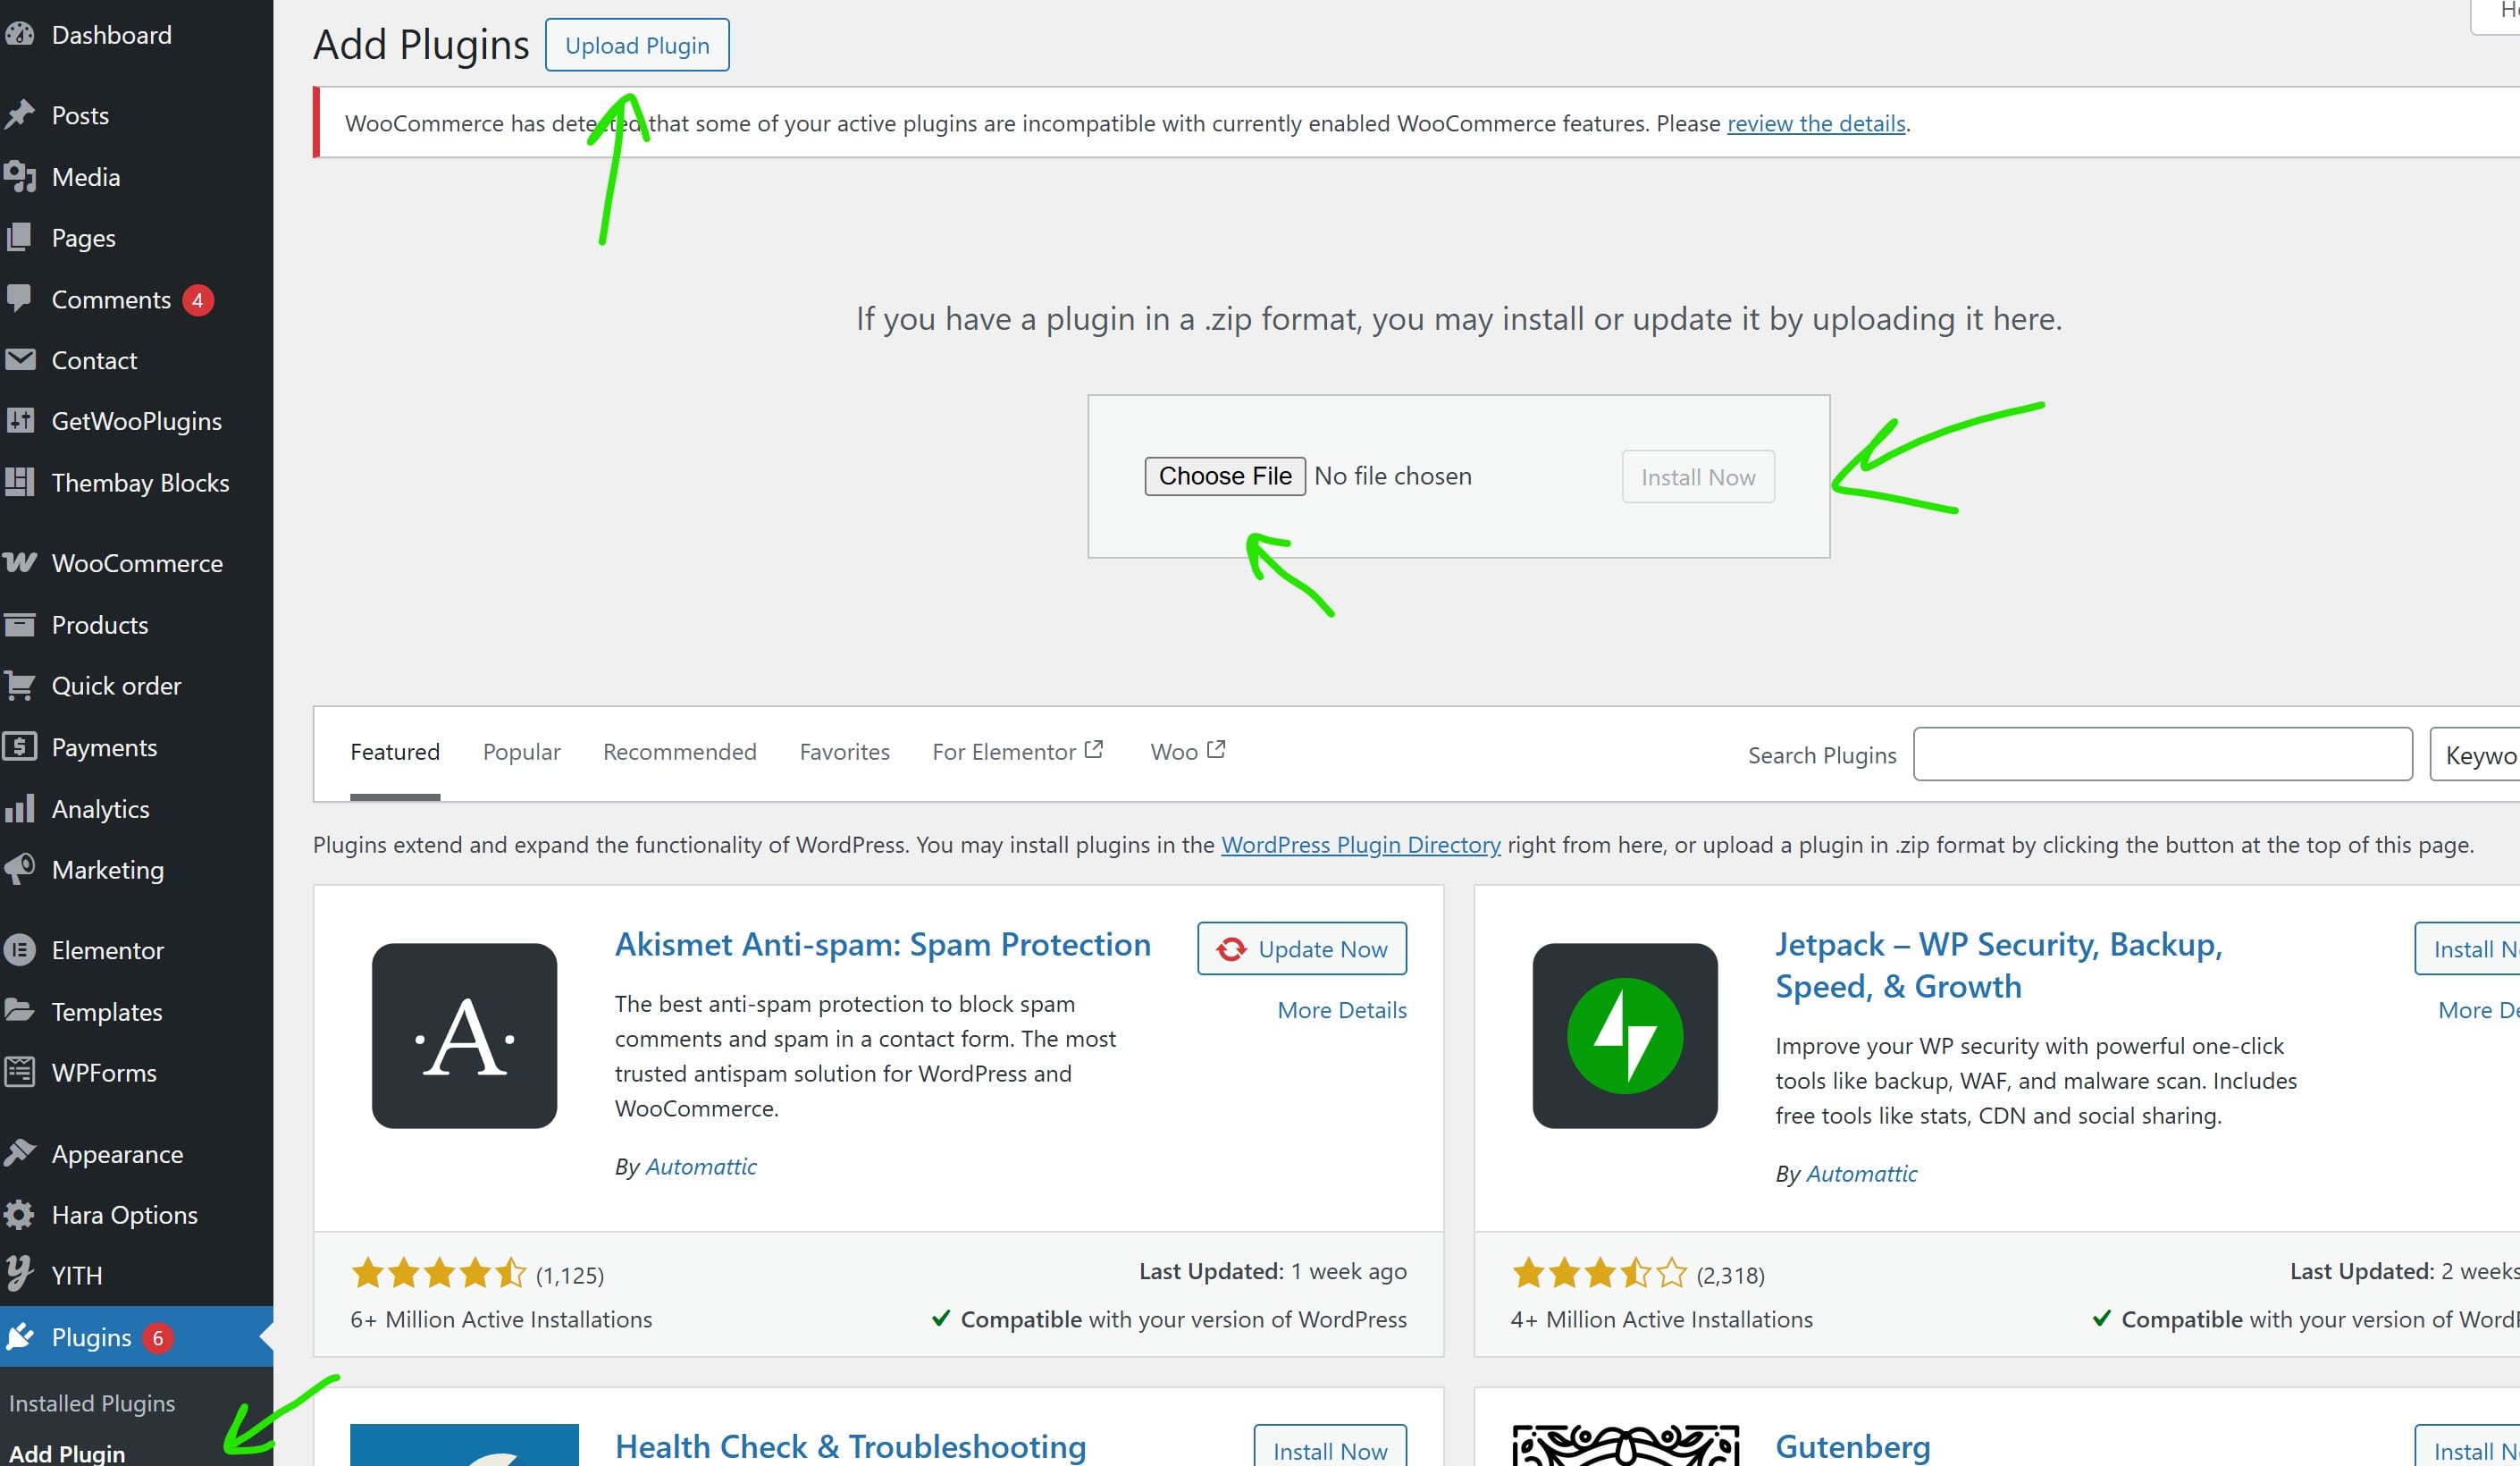
- Navigate to Plugins > Add New
- Click the Upload Plugin button at the top of the page
- Click Choose File and select the plugin ZIP file you downloaded
- Click Install Now
- After installation, click Activate Plugin
Method 2: Install via FTP
- Unzip the plugin ZIP file on your computer
- Connect to your server using an FTP client
- Upload the entire
quick-orderfolder to the/wp-content/plugins/directory - Log in to your WordPress admin dashboard
- Navigate to Plugins
- Find "QuickOrder" in the list and click Activate
Verifying Installation
After activation, you should see a new menu item called Order Form in your WordPress admin sidebar. This indicates that the plugin has been successfully installed and activated.
Purchasing and Refund Policy
QuickOrder is a premium WordPress plugin that requires a license for full functionality. Please note the following important information:
Purchasing the Plugin
When you install the plugin, you will need to purchase a license to unlock all features. The license can be purchased directly from our website or through the plugin's settings page.
- Navigate to Order Form > License in your WordPress admin
- Click on the Purchase License button
- Complete the checkout process
- Enter your license key in the plugin settings
Refund Policy
We offer a 15-day money-back guarantee on all purchases. If you're not satisfied with the plugin for any reason, you can request a full refund within 15 days of your purchase.
To request a refund:
- Contact our support team at jabar.omr@gmail.com
- Include your order number and the email address used for purchase
- Briefly explain why you're requesting a refund
We process all refund requests within 3 business days. Please note that after the 15-day period, refunds cannot be issued.
General Settings
To configure the plugin, navigate to Order Form > Settings in your WordPress admin sidebar. The settings page is divided into several tabs for easy navigation.
Price and Currency Settings
The plugin now includes improved price and currency handling with the following features:
- Currency Format Preservation: Maintains the original currency format when updating quantities
- Dynamic Price Calculation: Accurately calculates prices based on quantity changes
- Order Summary Display: Configurable options for showing product price and shipping costs separately
- Default Shipping Costs: Option to enable or disable default shipping costs
These settings can be found in the Order Summary section of the settings page, providing granular control over how prices and shipping costs are displayed to customers.
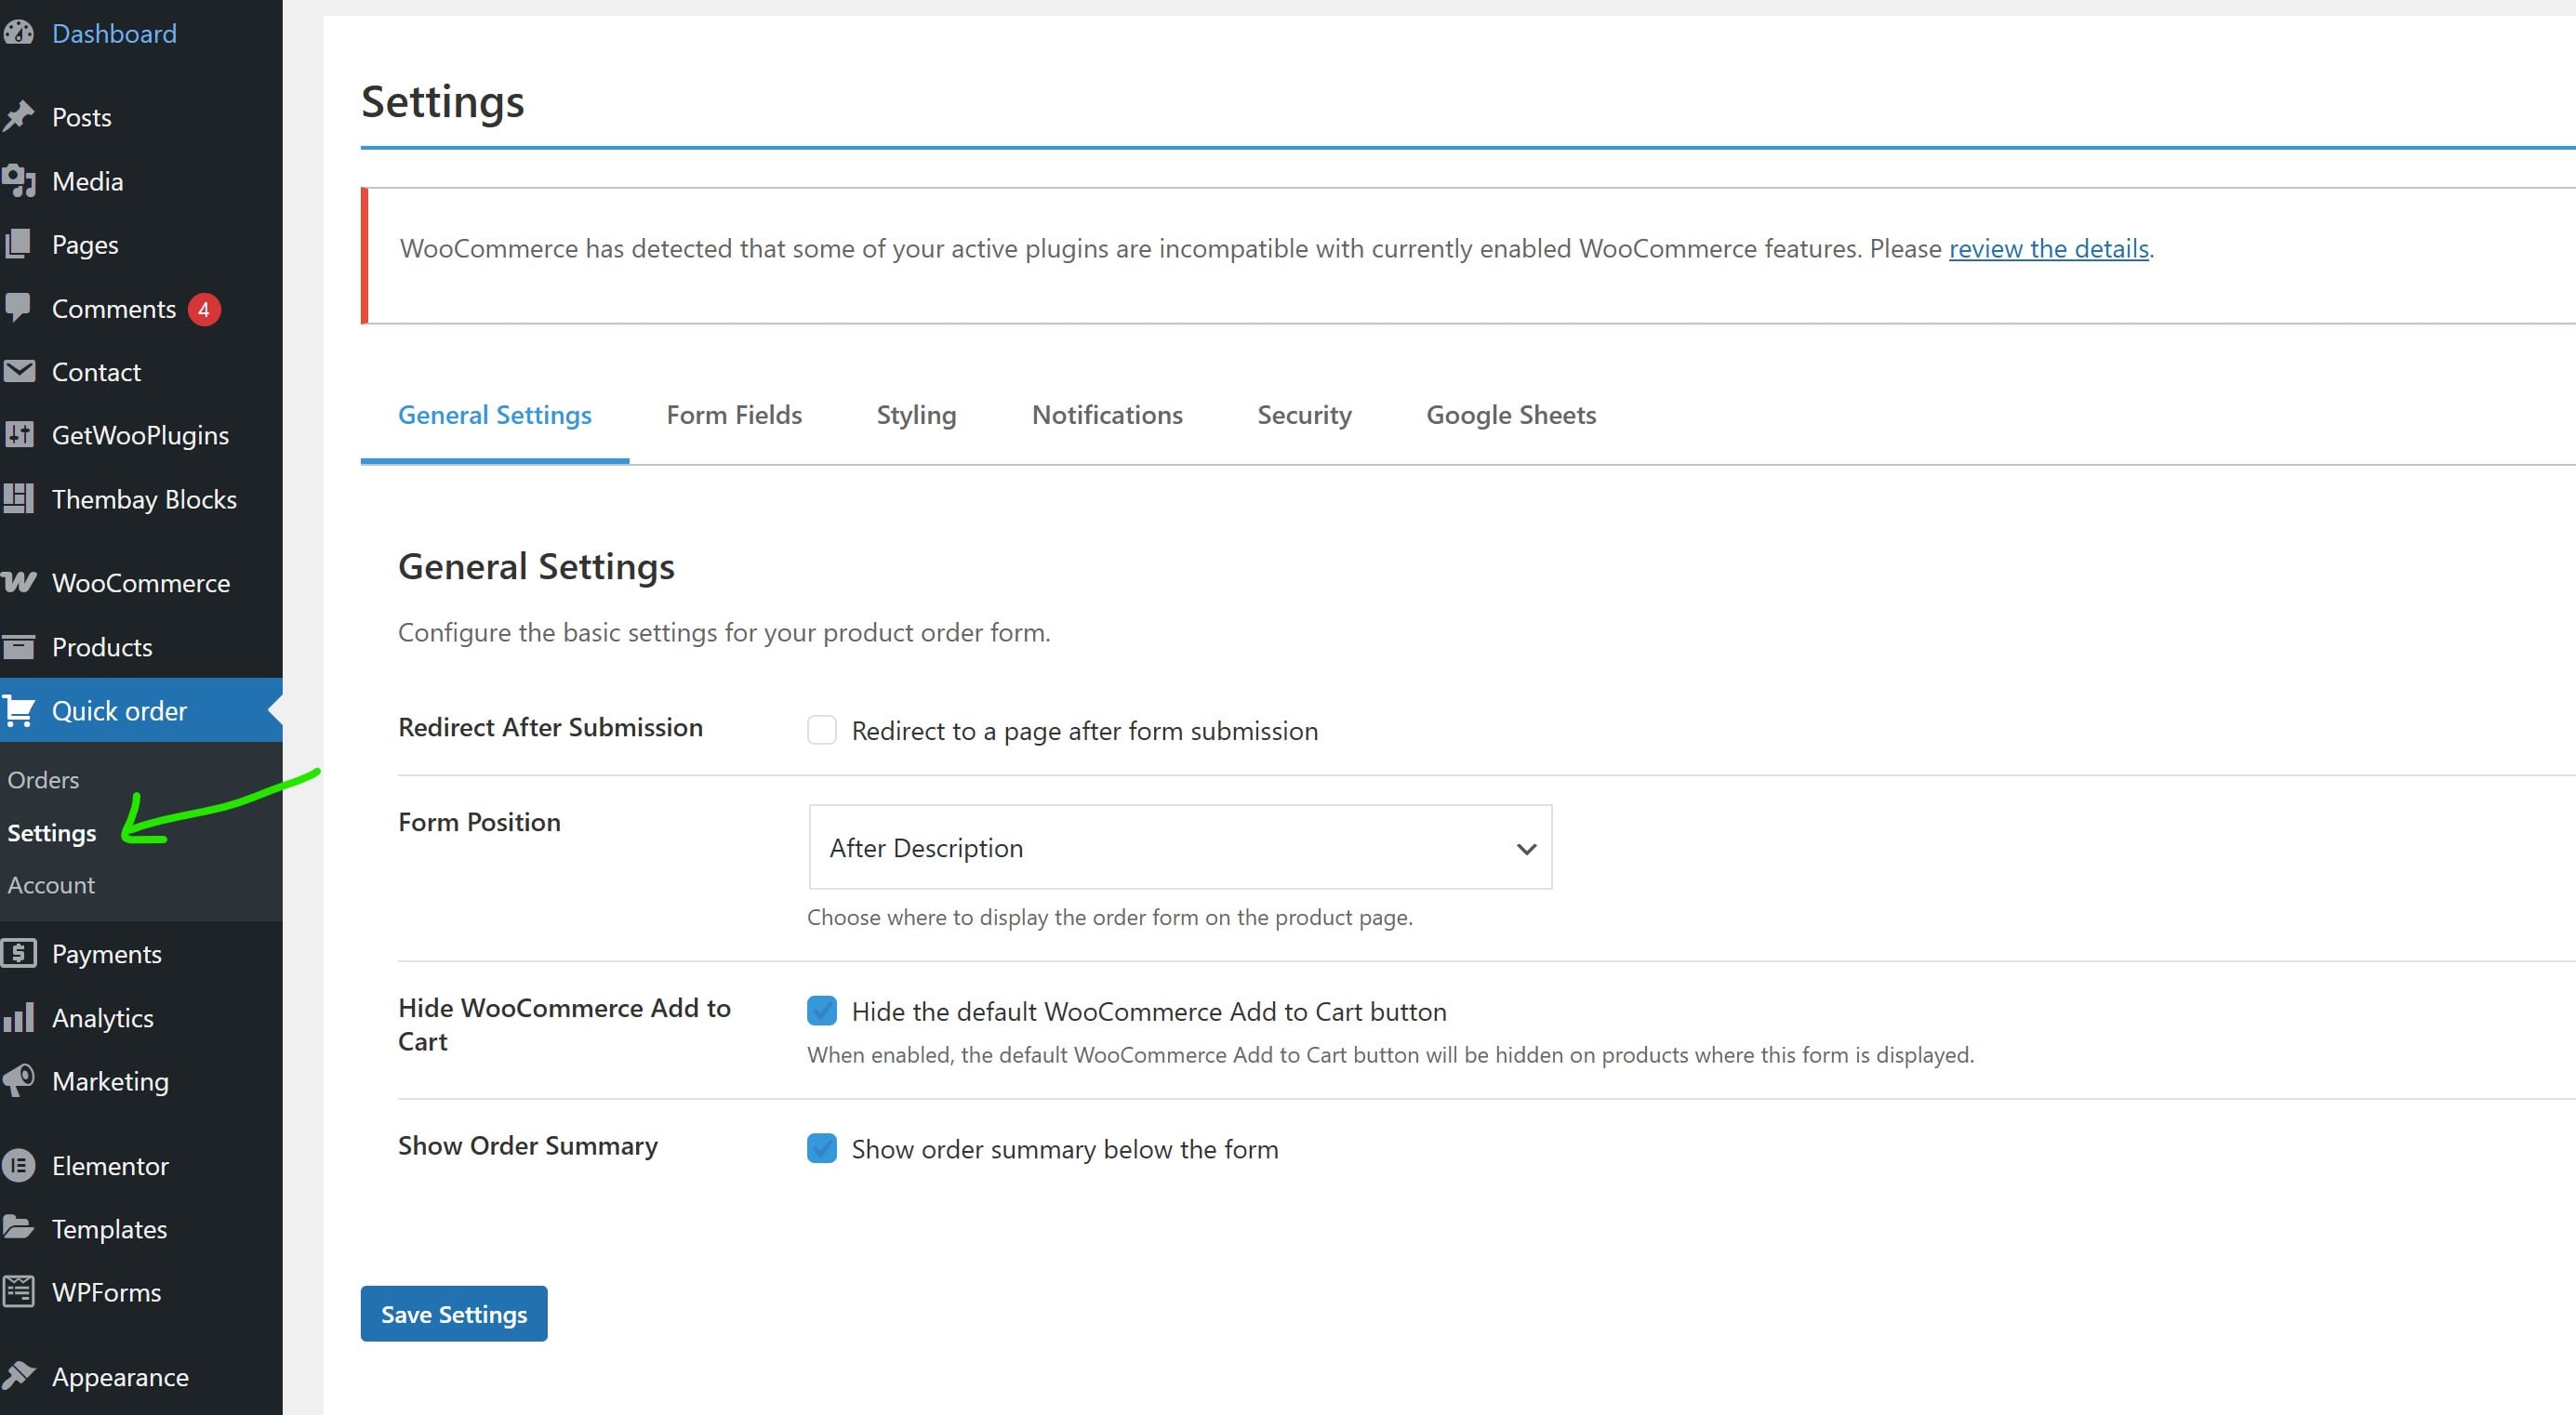
Form Position
You can choose where the order form appears on your product pages:
- Before Summary: Displays the form before the product summary
- After Description: Displays the form after the product description
- After Summary: Displays the form after the product summary (default)
Form Title and Subtitle
You can customize the title and subtitle that appear above the order form:
- Form Title: The main heading for your order form (default: "Order Form")
- Form Subtitle: A brief description or instructions for customers (default: "Please fill out the form below to place your order for this product.")
Other General Settings
- Show Labels: Enable this option to display labels above form fields
- Hide WooCommerce Add to Cart: Enable this to hide the default WooCommerce Add to Cart button (more details in the dedicated section below)
- Field Spacing: Set the spacing between form fields in pixels
- Redirect After Submission: Choose whether to redirect customers to a specific page after form submission
- Redirect Page: Select the page to redirect to if the above option is enabled
Form Fields
The Fields tab allows you to customize the fields that appear in your order form. You can add, edit, or remove fields as needed.
Default Fields
By default, the form includes the following fields:
- Name: Customer's full name
- Email: Customer's email address
- Phone: Customer's phone number
- Message: Additional information or special requests
- Quantity: Number of products to order
Adding Custom Fields
To add a custom field:
- Click the Add Field button
- Select the field type from the dropdown (Text, Email, Number, Textarea, Checkbox, Radio, Select)
- Enter a label for the field
- Set whether the field is required
- Add a placeholder text if applicable
- For select, radio, or checkbox fields, add options as needed
- Click Save Field
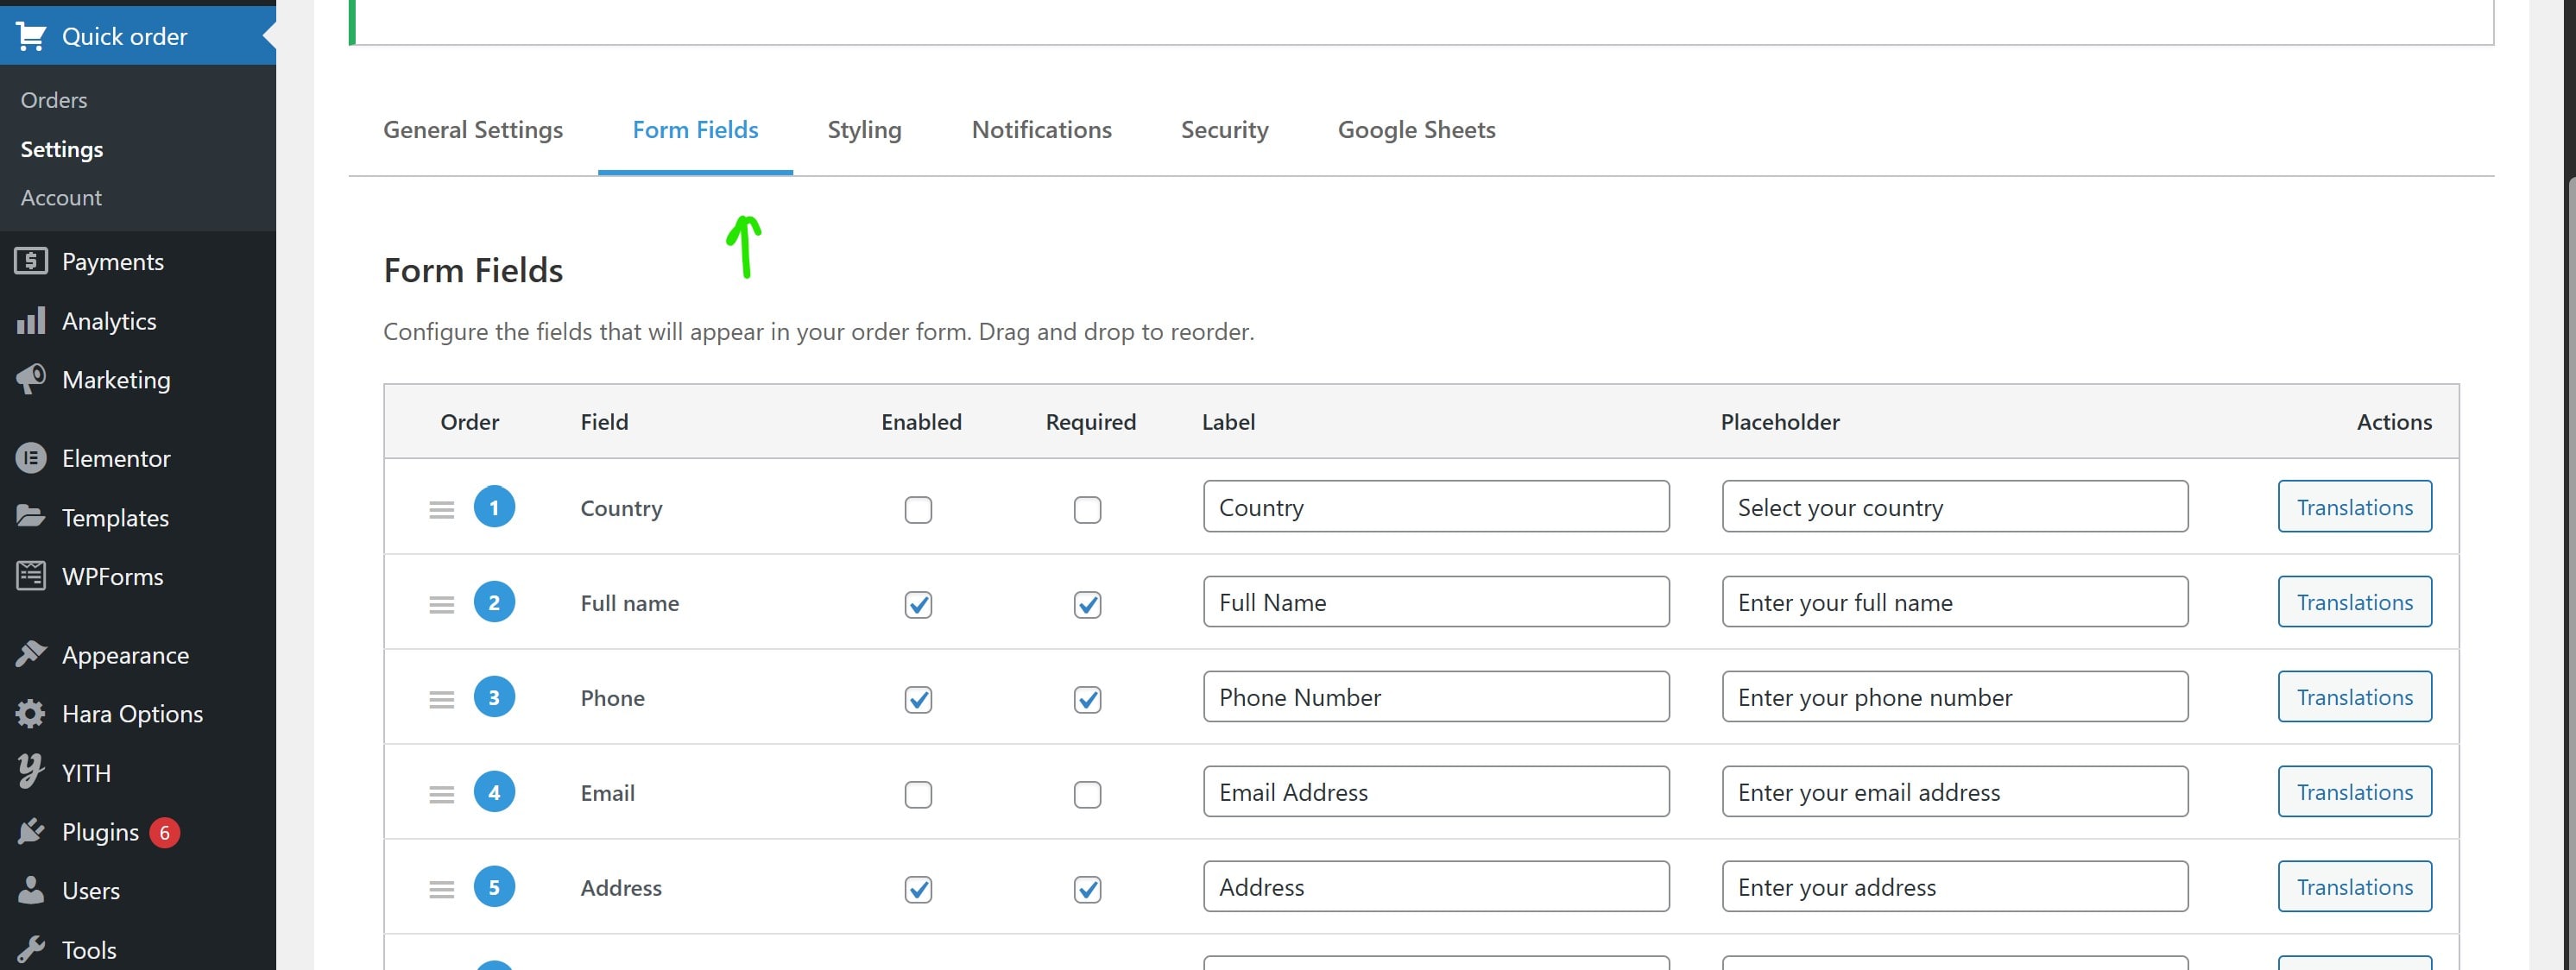
Reordering Fields
You can change the order of fields by dragging and dropping them in the fields list. Simply click and hold on a field, then drag it to the desired position.
Editing or Deleting Fields
To edit a field, click the Edit button next to the field in the list. To delete a field, click the Delete button.
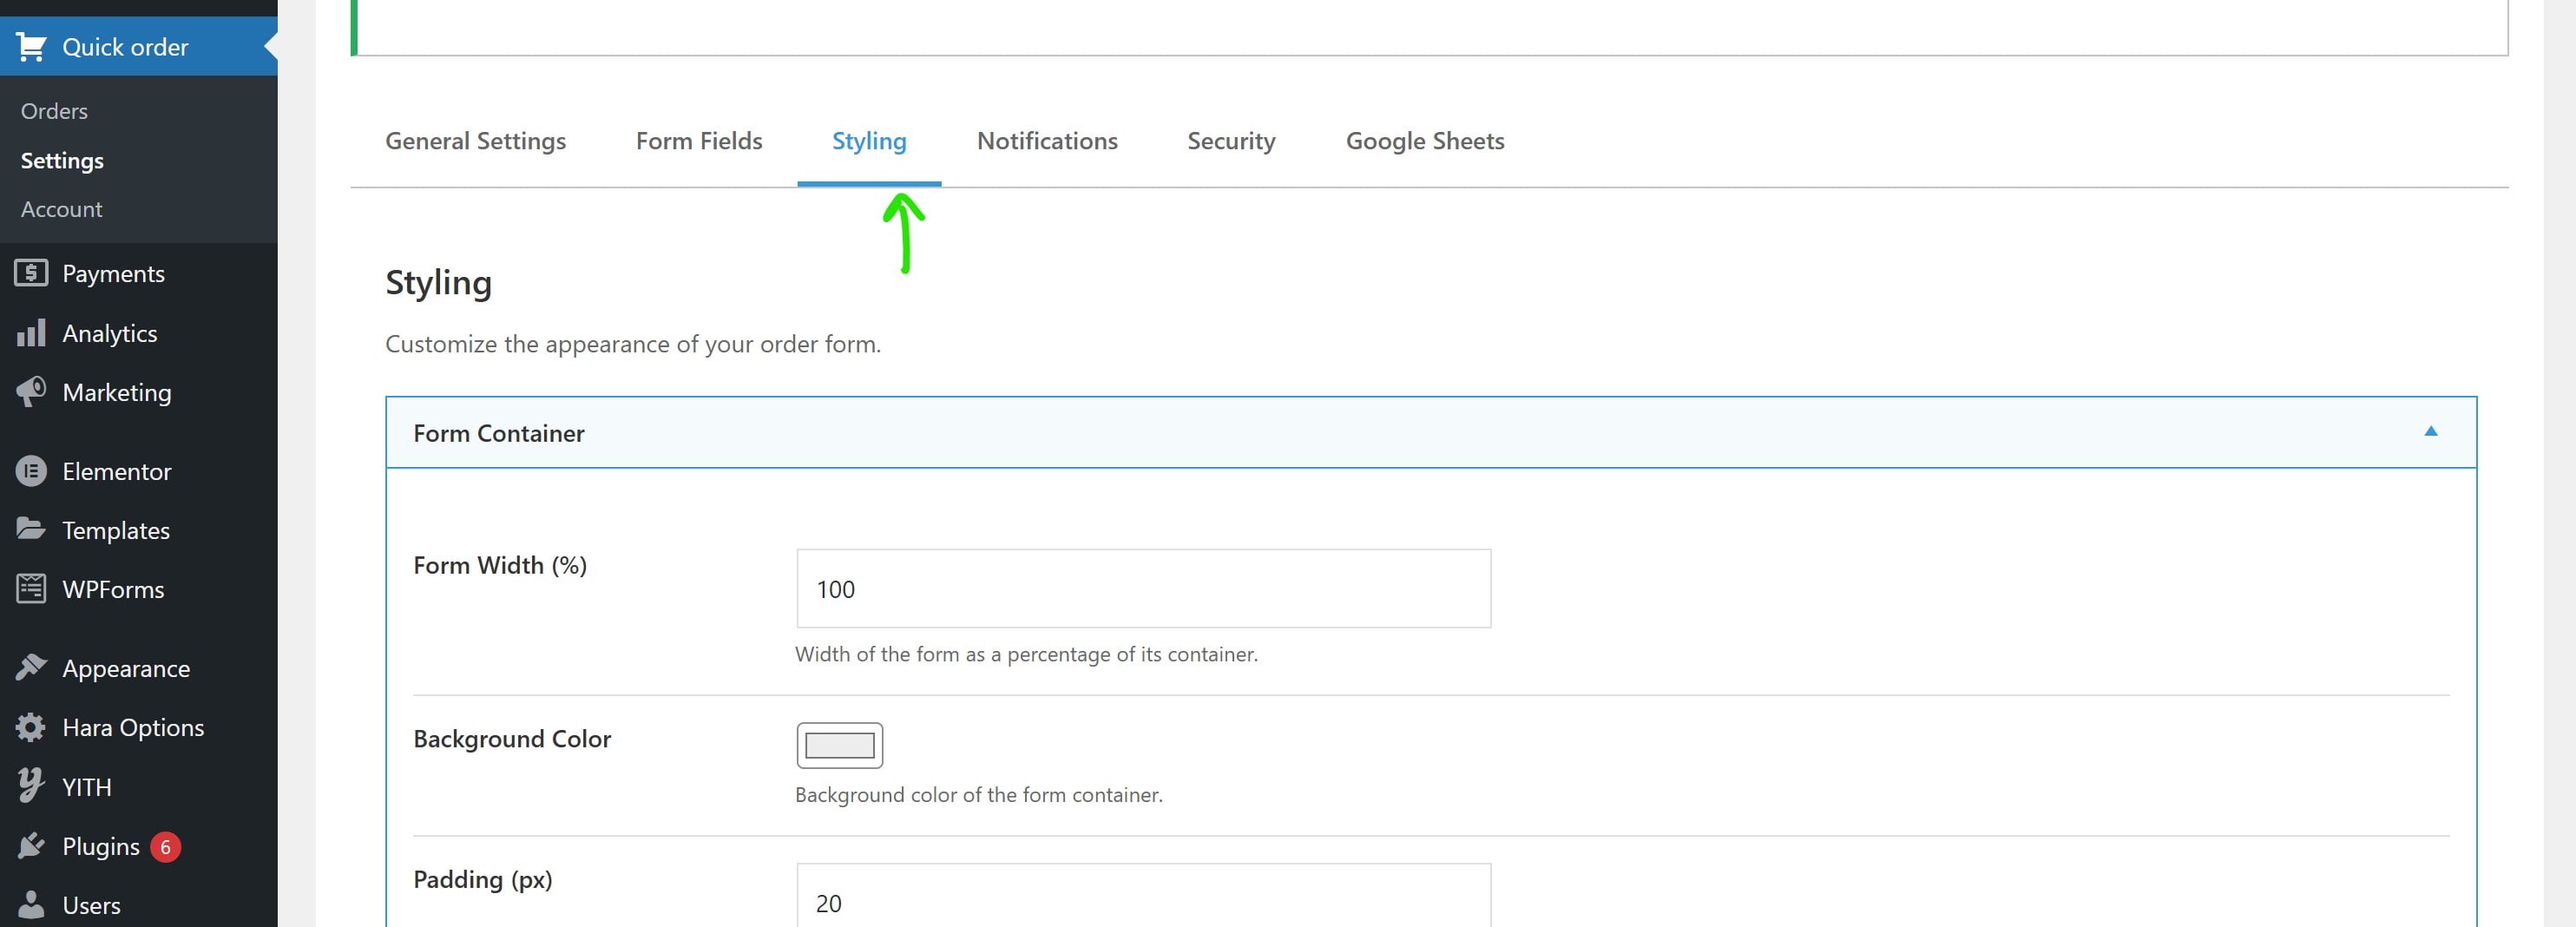
Styling Options
The Styling tab allows you to customize the appearance of your order form to match your website's design.
Form Width
You can set the width of the form as a percentage of the container width. The default is 100% (full width).
Colors
Customize the following colors to match your brand:
- Primary Color: Used for buttons, borders, and accents
- Secondary Color: Used for hover states and secondary elements
- Text Color: The main text color for the form
- Background Color: The background color of the form
Typography
Customize the typography settings:
- Font Size: The base font size for form text
- Heading Font Size: The font size for the form title
- Button Font Size: The font size for buttons
Spacing and Layout
- Padding: The internal spacing of the form
- Border Radius: The roundness of corners for form elements
- Button Padding: The internal spacing of buttons
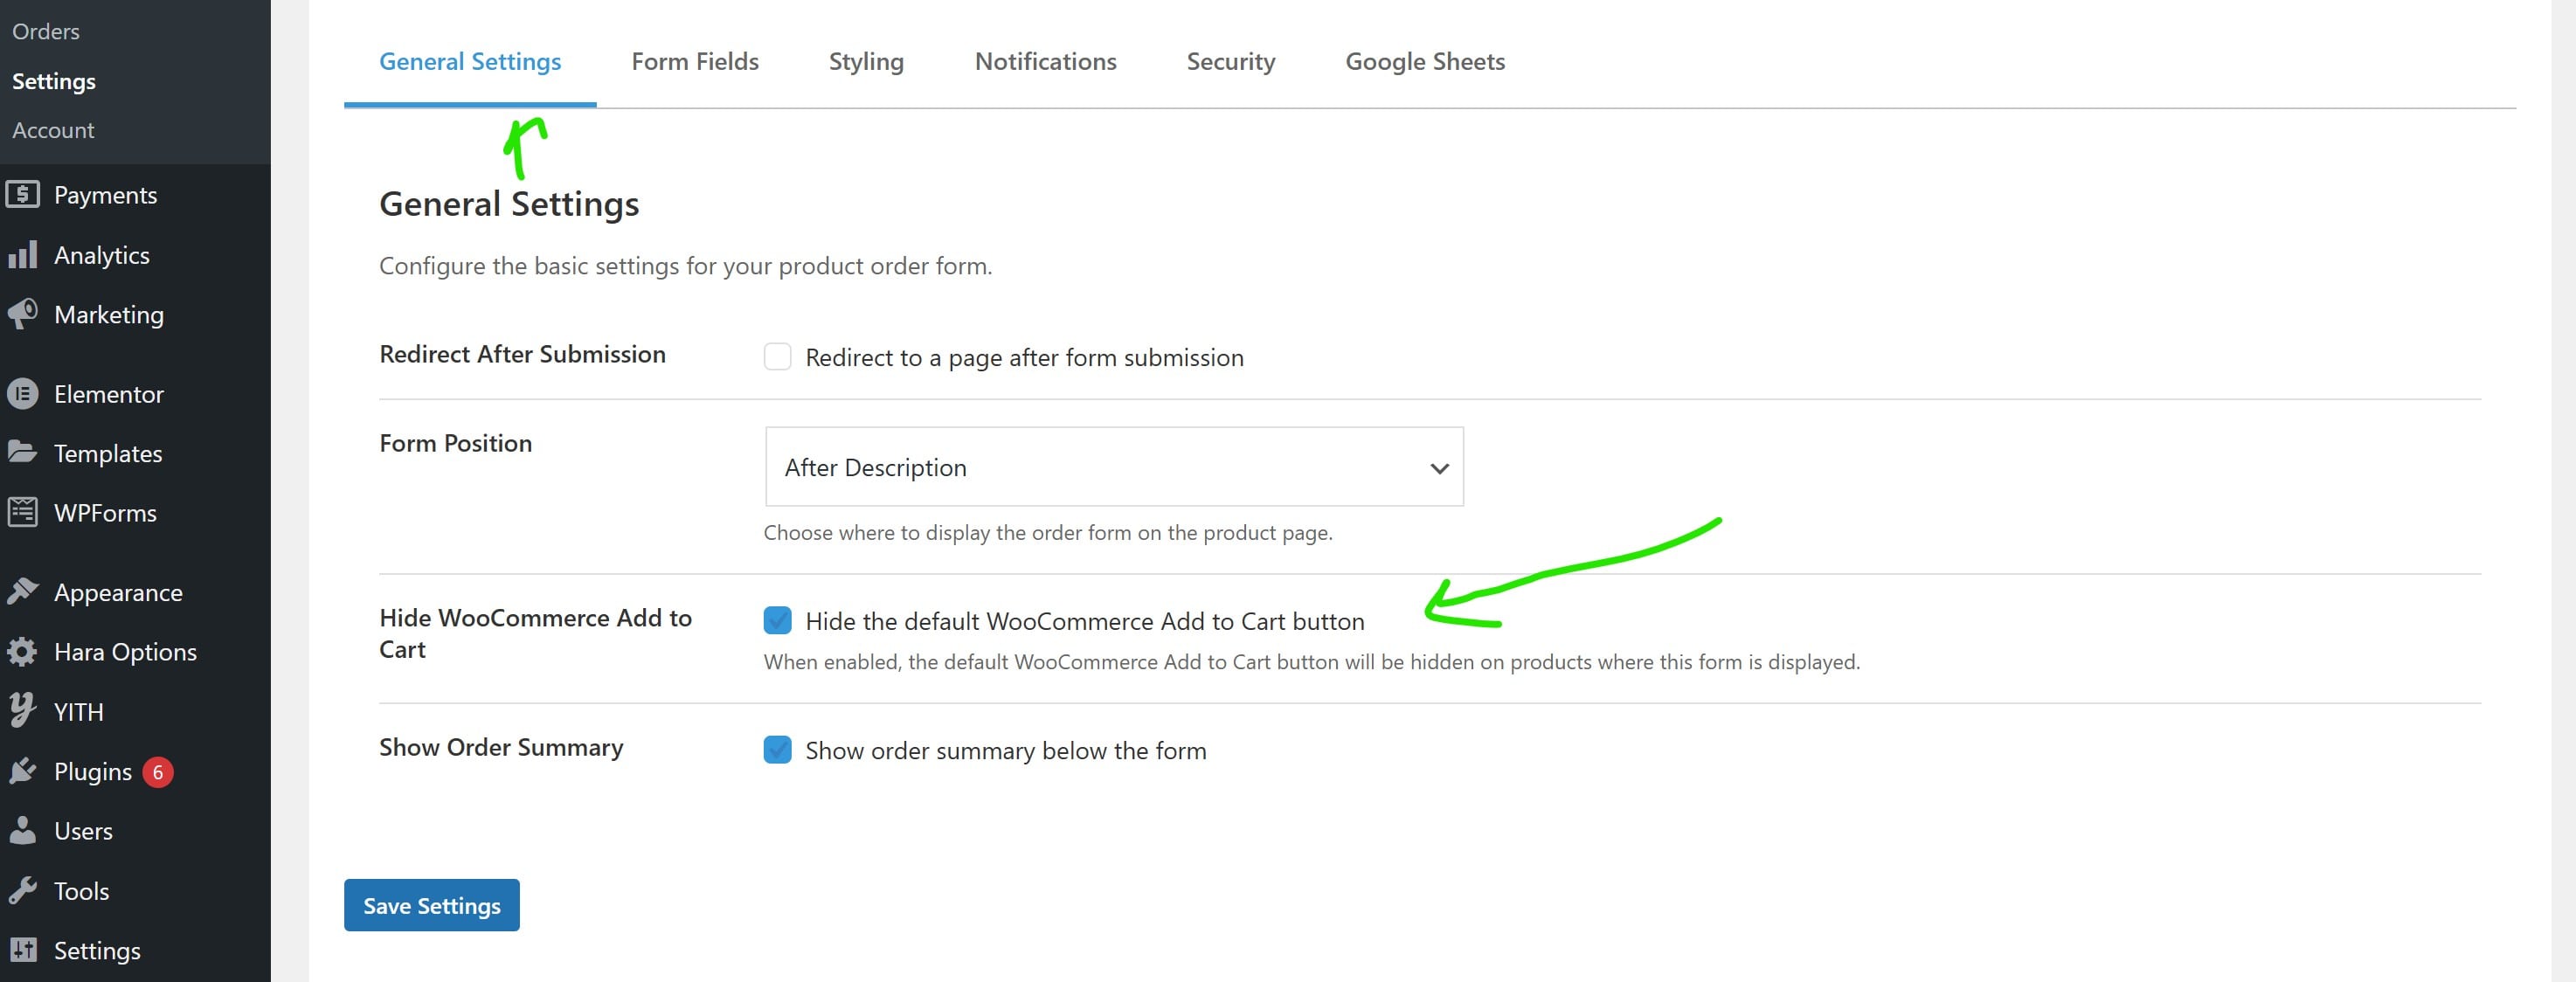
Hide Add to Cart Button
The plugin includes an option to hide the default WooCommerce Add to Cart button when your custom order form is displayed. This is useful when you want your order form to be the only way for customers to place orders.
Enabling the Feature
To hide the Add to Cart button:
- Go to Order Form > Settings
- In the General tab, check the Hide WooCommerce Add to Cart option
- Save your changes
How It Works
When this option is enabled, the plugin:
- Removes the standard WooCommerce Add to Cart button from the product page
- Adds CSS to hide any theme-specific Add to Cart buttons
- Ensures that the quantity selector and variation selectors are also hidden
This creates a clean interface where customers can only use your custom order form to place orders.
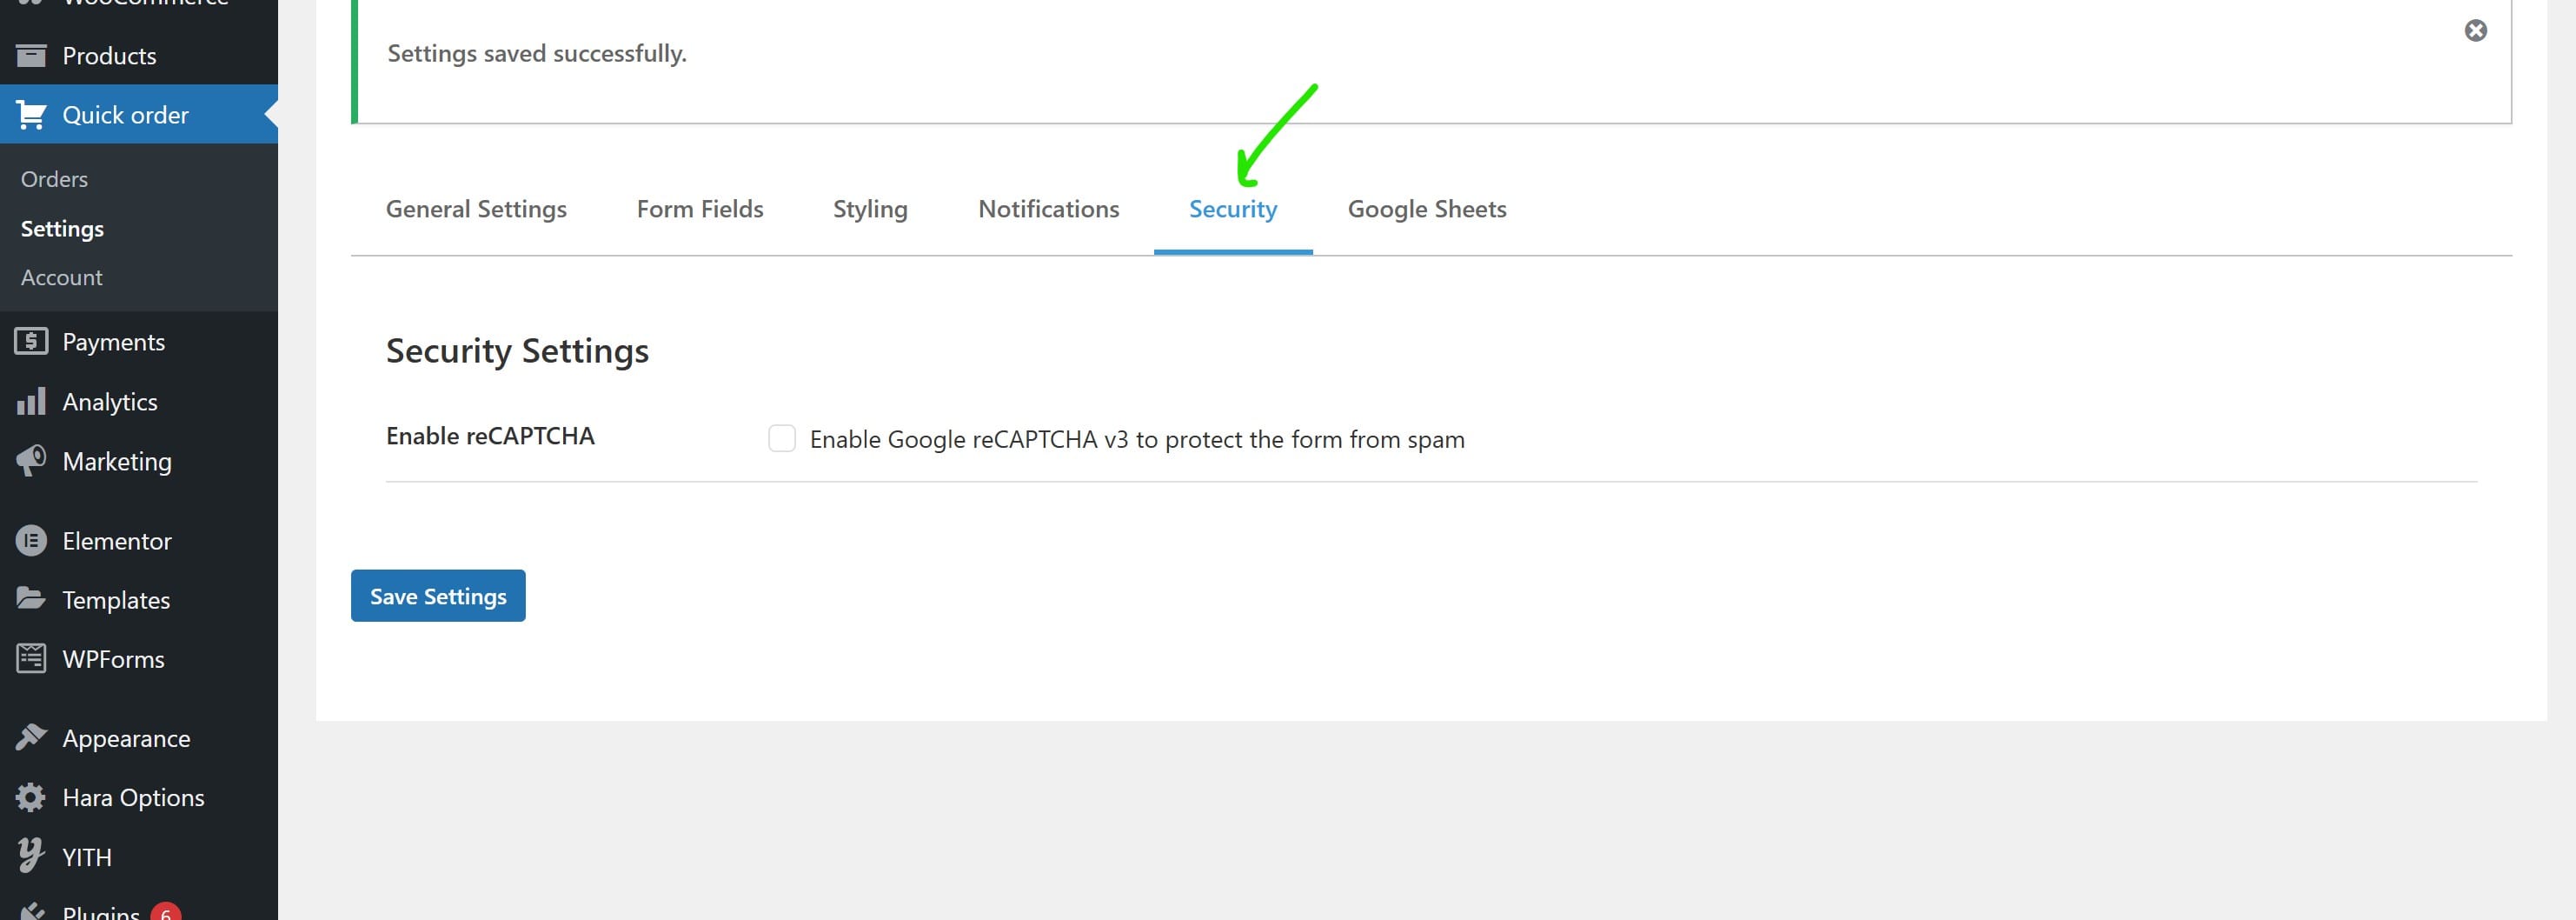
reCAPTCHA Integration
To protect your forms from spam submissions, the plugin includes integration with Google reCAPTCHA.
Setting Up reCAPTCHA
- Go to the Google reCAPTCHA website
- Sign in with your Google account
- Click + Create to create a new reCAPTCHA site
- Enter a label for your site (e.g., "My WooCommerce Store")
- Select reCAPTCHA v2 as the type
- Add your domain(s) to the list of allowed domains
- Accept the Terms of Service and click Submit
- Copy the Site Key and Secret Key
Configuring reCAPTCHA in the Plugin
- Go to Order Form > Settings
- Navigate to the Notifications tab
- Check the Enable reCAPTCHA option
- Paste your Site Key and Secret Key in the respective fields
- Save your changes
Using Shortcodes
The plugin provides a shortcode that allows you to place the order form anywhere on your site, not just on product pages.
Basic Shortcode
To display the order form, use the following shortcode:
[wcpof_order_form]Shortcode with Product ID
To display the order form for a specific product, use the following shortcode with the product ID:
[wcpof_order_form product_id="123"]Replace 123 with the actual product ID.
Where to Use Shortcodes
You can use the shortcode in:
- Pages
- Posts
- Custom post types
- Widgets that support shortcodes
- Page builder elements that support shortcodes
Google Sheets Integration
QuickOrder allows you to automatically send form submissions to Google Sheets, making it easy to track and analyze your orders in a spreadsheet format. This integration is perfect for businesses that want to maintain order records outside of WordPress or need to share order data with team members.
Setting Up Google Sheets Integration
Follow these steps to set up the Google Sheets integration:
- Create a new Google Sheet where you want to store your order data
- Go to Extensions > Apps Script in your Google Sheet
- Replace the default code with the script provided below
- Save the project with a name like "WC Product Order Form"
- Deploy as a web app:
- Click "Deploy" > "New deployment"
- Select type: "Web app"
- Set "Execute as" to "Me"
- Set "Who has access" to "Anyone"
- Click "Deploy"
- Copy the web app URL provided after deployment
- Paste the URL in your QuickOrder plugin settings under the "Integrations" tab

Google Apps Script Code
Copy and paste the following code into your Google Apps Script editor:
/**
 * Google Apps Script for WC Product Order Form
 *
 * This script receives order data from your WordPress site and adds it to a Google Sheet.
 *
 * SETUP INSTRUCTIONS:
 * 1. Create a new Google Sheet
 * 2. Go to Extensions > Apps Script
 * 3. Replace the default code with this script
 * 4. Save the project with a name like "WC Product Order Form"
 * 5. Deploy as a web app:
 *    - Click "Deploy" > "New deployment"
 *    - Select type: "Web app"
 *    - Set "Execute as" to "Me"
 *    - Set "Who has access" to "Anyone"
 *    - Click "Deploy"
 * 6. Copy the web app URL and paste it in your plugin settings
 */

// The doPost function is called when data is sent to the web app
function doPost(e) {
  try {
    // Parse the JSON data sent from WordPress
    const data = JSON.parse(e.postData.contents);

    // Get the active spreadsheet and the first sheet
    const ss = SpreadsheetApp.getActiveSpreadsheet();
    const sheet = ss.getSheets()[0];

    // Check if headers exist, if not create them
    // Also check if we need to create headers even if they exist (for new fields)
    const forceCreateHeaders = e.parameter && e.parameter['X-Create-Headers'] === 'true' ||
                              (e.headers && e.headers['X-Create-Headers'] === 'true');

    if (sheet.getLastRow() === 0 || forceCreateHeaders) {
      createHeaders(sheet, data);
    }

    // Get headers to ensure we're adding data in the right columns
    const headers = sheet.getRange(1, 1, 1, sheet.getLastColumn()).getValues()[0];

    // Prepare the row data based on headers
    const rowData = headers.map(header => {
      // Special handling for phone numbers to ensure they're treated as text
      if (header === 'customer_phone' || header.includes('phone')) {
        if (!data[header]) return '';

        // If the value has our special PHONE: prefix, remove it before display
        if (data[header].startsWith("'")) {
          // Remove the prefix but keep it as text by adding a single quote
          return data[header];
        }

        // For any other phone number, ensure it's treated as text
        return "'" + data[header];
      }

      // Return the value from data or empty string if not found
      return data[header] !== undefined ? data[header] : '';
    });

    // Add the new row to the sheet
    sheet.appendRow(rowData);

    // Return success response
    return ContentService.createTextOutput(JSON.stringify({
      'success': true,
      'message': 'Data saved successfully'
    })).setMimeType(ContentService.MimeType.JSON);

  } catch (error) {
    // Log the error
    console.error('Error processing data: ' + error.message);

    // Return error response
    return ContentService.createTextOutput(JSON.stringify({
      'success': false,
      'error': error.message
    })).setMimeType(ContentService.MimeType.JSON);
  }
}

// Create headers based on the data received
function createHeaders(sheet, data) {
  // Get existing headers if any
  let existingHeaders = [];
  if (sheet.getLastRow() > 0) {
    existingHeaders = sheet.getRange(1, 1, 1, sheet.getLastColumn()).getValues()[0];
  }

  // Get all keys from the data
  const dataKeys = Object.keys(data);

  // Combine existing headers with new keys from data
  let allHeaders = existingHeaders.slice();

  // Add any new headers that don't already exist
  dataKeys.forEach(key => {
    if (!allHeaders.includes(key)) {
      allHeaders.push(key);
    }
  });

  // If we have headers, clear the first row and set the new headers
  if (allHeaders.length > 0) {
    // If there are existing headers, clear them first
    if (existingHeaders.length > 0) {
      sheet.getRange(1, 1, 1, existingHeaders.length).clearContent();
    }

    // Set the new headers
    sheet.getRange(1, 1, 1, allHeaders.length).setValues([allHeaders]);

    // Freeze the header row and make it bold
    sheet.setFrozenRows(1);
    sheet.getRange(1, 1, 1, allHeaders.length).setFontWeight('bold');
  }
}

// Test function to verify the script is working
function testScript() {
  const testData = {
    order_id: '12345',
    order_date: '2023-01-01 12:00:00',
    product_id: '789',
    product_name: 'Test Product',
    order_status: 'processing',
    quantity: 2,
    total: 99.99,
    customer_name: 'John Doe',
    customer_email: 'john@example.com',
    customer_phone: "'0123456789", // Note the leading single quote to preserve leading zeros
    field_address: '123 Main St',
    field_notes: 'Test notes'
  };

  // Simulate a POST request
  const e = {
    postData: {
      contents: JSON.stringify(testData)
    },
    parameter: {
      'X-Create-Headers': 'true'
    }
  };

  // Call doPost with the test data
  const result = doPost(e);

  // Log the result
  Logger.log(result.getContent());
}
How It Works
The integration works as follows:
- When a customer submits an order form on your website, the plugin collects all form data
- If Google Sheets integration is enabled, the plugin sends this data to your Google Apps Script web app
- The script processes the data and adds it as a new row in your Google Sheet
- The script automatically creates headers for all form fields if they don't exist
- Special handling is applied for phone numbers to preserve formatting
Data Fields
The following data is sent to Google Sheets:
- order_id: The WooCommerce order ID
- order_date: Date and time of the order
- product_id: ID of the ordered product
- product_name: Name of the ordered product
- order_status: Current status of the order
- quantity: Number of items ordered
- total: Total order amount
- customer_name: Customer's full name
- customer_email: Customer's email address
- customer_phone: Customer's phone number
- field_*: Any custom fields from your form (prefixed with "field_")
Testing the Integration
The script includes a testScript() function that you can run to verify that
everything is working correctly:
- After saving the script, click the dropdown menu next to "Debug" (or "Run")
- Select the
testScriptfunction - Click "Run" or "Debug"
- Check your Google Sheet to see if a test row has been added
If the test is successful, your integration is working properly and ready to receive real order data.
Troubleshooting Google Sheets Integration
If you encounter issues with the Google Sheets integration, check the following:
- Web App URL: Make sure you've copied the correct URL from the deployment
- Permissions: Ensure you've set "Who has access" to "Anyone" during deployment
- Script Errors: Check the Apps Script execution logs for any errors (View > Logs)
- Quota Limits: Google Apps Script has usage quotas that may affect high-volume sites
Troubleshooting
If you encounter issues with the plugin, try these troubleshooting steps:
Form Not Displaying
- Check if WooCommerce is active and up to date
- Verify that the plugin is activated
- Make sure you're viewing a product page or using the shortcode correctly
- Check if your theme is compatible with WooCommerce hooks
- Try switching to a default WordPress theme temporarily to rule out theme conflicts
Styling Issues
- Check if your theme has CSS that might be conflicting with the form styles
- Try adding
!importantto your custom CSS rules - Use browser developer tools to inspect the elements and identify conflicting styles
Form Submission Not Working
- Check if JavaScript is enabled in your browser
- Verify that all required fields are filled out
- Check if reCAPTCHA is configured correctly (if enabled)
- Look for JavaScript errors in the browser console
Frequently Asked Questions
Can I use this plugin with any WordPress theme?
Yes, the plugin is designed to work with any WordPress theme that supports WooCommerce. The plugin includes options to customize the appearance to match your theme's design.
Can I add custom fields to the order form?
Yes, you can add, edit, and remove fields from the form using the Fields tab in the plugin settings. You can create various field types including text, email, number, textarea, checkbox, radio, and select.
Will the form data be saved with the order?
Yes, all form data submitted by customers is saved with the order and can be viewed in the order details in your WooCommerce admin.
Can I translate the plugin to another language?
Yes, the plugin is translation-ready. You can use tools like Loco Translate or WPML to translate the plugin strings to your language.
Does the plugin work with variable products?
Yes, the plugin works with all WooCommerce product types, including simple, variable, grouped, and external products.
Can I style the form to match my website's design?
Yes, the plugin includes extensive styling options in the Styling tab. You can customize colors, typography, spacing, and more. You can also add custom CSS for more advanced customization.